Xara Designer Pro X11 First Look — By Gary W. Priester
New Auto-Hyphenation
Designer Pro X11 now has the option for automatic hyphenation. You can specify the minimum size word that can be hyphenated. You can also enter your own hyphenation preferences. All of these settings are explained a lot better than I can in the context sensitive Help menu. Just press the Help button. The Hyphenation Settings are in the Spell Checker menu. (All Help in Xara products is context sensitive and explains in considerable detail the options for any particular menu. F1 does this too).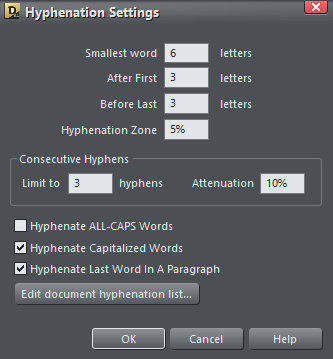
New Auto-Correction
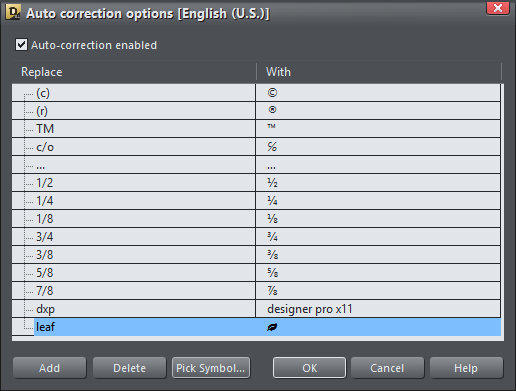
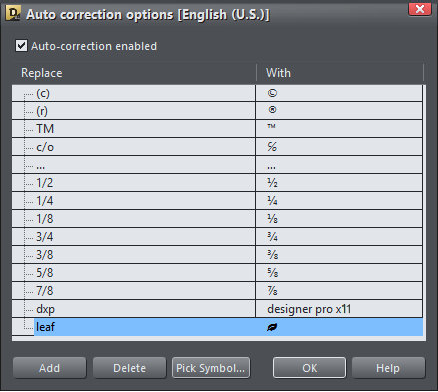
Auto-Correct is just plain cool. I am not a particularly good typist. And I need all the help I can get. With auto-correction enabled (also found in the Spell Check menu), when I key in 3/8 Designer Pro X11 automatically changes it to ⅜. You can create your own shortcuts too. If I key in dxp it automatically changes to Designer Pro X11. You can create shortcuts for long words, company or product names, or just words you can never remember how to spell. If I key in leaf it becomes . You can use any of the Font Awesome symbols. (The number of Font Awesome symbols has also been expanded). TIP: How you key in the abbreviation in your text effects how the expanded text is displayed. If I key in dpx, I get designer pro x11, all lower case. Dxp produces Designer Pro X11, with initial caps. And DXP produces DESIGNER PRO X11, all caps. Don’t you just it?New Embedded Object Options
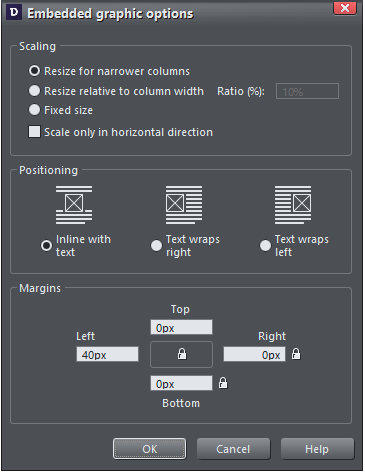
Now when you embed an object such as a large photo in your text, that is wider than the text area, by default the object will be scaled down to the width of the text area. But there is also a new set of options that give you more control and that is more intuitive as you can see in the new Embedded Graphic Options dialog above. In addition to scaling the embedded object you can determine its position in the text, plus you can specify margins around the embedded object. You can also specify the size of the embedded object in percentages. This is useful if you want to add a rule to separate one area of text from the next. I used an embedded Art Brush Stroke above to offset this new bit of text. The Art Brush-stroke adds a lovely touch of elegance.
New Replace Font
There are times when it would be helpful to replace an entire font in your document, all with one click, even if you did not create a Text Style! Now you can. Highlight the text you want to change with the Text Tool, right click and select Replace Font With… The Replace Font dialog opens and you can select a font, and style (bold, italic, etc.) from the drop down menu. Click Apply. How easy is that? And all the current instances of that font are replaced just like that! A similar new feature is called Update Style to Match. Let’s say you have created a style Normal Text and that style is Open Sans. But you have just imported a document that uses Georgia Italic and you love the way it looks. Darn! you exclaim, I wish I had used that font. Well, now it’s as simple as this. Right click on the selected imported text, select Update Other Style to Match. Click Apply.
[Click Apply]
Improved PDF Import and Export
Importing PDF files has been improved in the following ways: Improved Text Edit-ability. In the past imported PDF files were difficult to edit because of the way the text was broken up. A single paragraph might be made up of a dozen segments. Now when you import a PDF document the formatting is in place and a paragraph of text is all one contiguous unit. Underscored text is supported as well as text hyperlinks. Embedded fonts are supported even if the font is not installed on your computer. And even though the text is not styled, you can easily update all the text in the document using Update Other Style to Match. Font outlines now export properly for PDF editing and support for CMYK PNG images has been added (though the ability to create CMYK PNG files in Xara has not been added).
And One or Two More Things
A new feature, Text Highlighting lets you (this will be no surprise), highlight text. Select some text, right click on a color on the color palette and select Set Text Background from the pop-up menu. And before I forget, a new feature Automatic Hyperlinking automatically adds a hyperlink to a web document or a PDF document. So if I key in www.xara.com the text is automatically hyperlinked to Xara.com. This works with email addresses as well. For example, bogus@ersatz.org. The rule above was added via the Insert menu and is called Rule-off. It inserts an in-line rule that can be edited in the Embedded Graphics Options. I edited the rule thusly: I increased the Line Width, Increased the Width % to 80%, and added the end caps in the Line Gallery. Rule-off can be used in long text to set paragraphs apart or to indicate a change of time or location in a story. Lastly, there’s a new option in Window > Bars, Extended Text InfoBar that displays the full text menu instead of the fly out text menu. This is a welcome option when working with a large monitor.


New Auto-Hyphenation
Designer Pro X11 now has the option for
automatic hyphenation. You can specify the
minimum size word that can be hyphenated.
You can also enter your own hyphenation
preferences. All of these settings are explained
a lot better than I can in the context sensitive
Help menu. Just press the Help button. The
Hyphenation Settings are in the Spell Checker
menu. (All Help in Xara products is context
sensitive and explains in considerable detail
the options for any particular menu.
New Auto-Correction
Auto-Correct is just plain cool. I am not a
particularly good typist. And I need all the help I
can get. With auto-correction enabled (also
found in the Spell Check menu), if I key in ⅜ for
example, Designer Pro X11 automatically
changes it to ⅜. You can create your own
shortcuts too. I added dxp and leaf. If I key in
dxp it automatically changes to Designer Pro
X11. If I key in leaf it becomes a symbol. You
can use any of the Font Awesome symbols.
(The number of Font Awesome symbols has
also been expanded). You can create shortcuts
for long words, company or product names, or
words you can never remember how to spell.
TIP: How you key in the abbreviation in your
text effects how the expanded text is displayed.
If I key in dpx, I get designer pro x11, all lower
case. Dxp produces Designer Pro X11, with
initial caps. And DXP produces DESIGNER PRO
X11, all caps. Don’t you just it?
New Embedded Object Options
Now when you embed an object such as a
large photo in your text, that is wider than the
text area, by default the object is scaled down
to the width of the text area. But there is also a
new set of options that give you more control
and that is more intuitive as you can
see in the new
Embedded Graphic
Options dialog above.
In addition to scaling
the embedded object
you can determine its
position in the text,
plus you can specify
margins around the
embedded object. You can also specify the size
of the embedded object in percentages. This is
useful if you want to add a rule to separate
one area of text from the next.
I used an embedded Art Brush Stroke above to
offset this new bit of text. The Art Brush-stroke
adds a lovely touch of elegance.


New Replace Font
There are times when it would be helpful to
replace an entire font in your document, all
with one click, even if you did not create a Text
Style! Now you can. Highlight the text you want
to change with the Text Tool, right click and
select Replace Font With… The Replace Font
dialog opens and you can select a font, and
style (bold, italic, etc.) from the drop down
menu. Click Apply. And all the current instances
of that font are replaced just like that!
New Update Styles to Match
A similar new feature is called Update Styles to
Match. Let’s say you have created a style
Normal Text and that style is Open Sans. But
you have just imported a document that uses
Georgia Italic and you love the way it looks.
Darn! you exclaim, I wish I had used that font.
Well, now it’s as simple as this. Right click on
the selected imported text, select Update Other
Style to Match. Click Apply.
[Tap Apply]
And One or Two More Things
A new feature, Text Highlighting lets you (this
will be no surprise), highlight text. Select some
text, right click on a color on the color palette
and select Set Text Background from the pop-
up menu.
And before I forget, a new feature Automatic
Hyperlinking automatically adds a hyperlink to
a web document or a PDF document. So if I key
in www.xara.com the text is automatically
hyperlinked to Xara.com. This works with email
addresses as well. For example, me@ersatz.org.
The rule above was added via the Insert menu
and is called Rule-off. It inserts an in-line rule
that can be edited in the Embedded Graphics
Options. I also edited the rule thusly: I
increased the Width % to 80%, and added the
end caps in the Line Gallery. Rule-off can be
used in long text to set paragraphs apart or to
indicate a change of time or location in a story.
Lastly, there’s a new option in Window > Bars,
Extended Text InfoBar that displays the full text
menu instead of the fly out text menu. This is a
welcome option for large monitors.


Improved PDF Import and Export
Importing PDF files has been
improved in the following ways. In
the past imported PDF files were
difficult to edit because of the way
the text was broken up. A single paragraph
might be made up of a dozen segments. Now
when you import a PDF document the format-
ting is in place and a paragraph of text is all
one contiguous unit. Underscored text is
supported as well as text hyperlinks.
Embedded fonts are supported even if the font
is not installed on your computer. And even
though the text is not styled, you can easily
update all the text in the document using
Update Other Style to Match. Font outlines now
export properly for PDF editing and support for
CMYK PNG images has been added (though not
the ability to create CMYK PNG files in Xara).


Xara Designer Pro X11